HOW TO USE OUR NEW WEBSITE
Welcome to the new KSER website! Below are the instructions for volunteers on using our new website. If you would like to print out these instructions, click here for a pdf version of this guide.
Using the KSER website
A guide for volunteers
KSER’s Content Management System
Back in the 20th century, updating and working on a website required special skills and mastery of some rather complicated web-design programs. The rest of us mortals could do simple things, but we could also create huge headaches purely by accident. These hurdles in usability prevented all but a few from playing a meaningful role in managing a website and its content.
But just as community radio pioneered efforts to make broadcast technology available to more people, the “Open Source” movement has pioneered technologies that make creation of website content easy and accessible to nearly anyone with a computer.
The KSER website is built using what’s called a Content Management System, powered by open source software, in our case, software called Drupal.
A content management system allows anyone with the proper permission to update content, write new pages, and in general, manage the portion of the website they have access to. As a volunteer, you now have the capacity to manage your own web page on the KSER website. You can maintain an online diary (called a blog), correspond with listeners, and post pictures and links on your page. Volunteers who are interested can be granted permission to manage and update other content on our website as well.
The process is relatively simple and is outlined in following pages of this guide.
If you cannot find the answer to your questions here, please contact Bruce directly. He can help you, and will incorporate your question in future revisions of this handout.
One note about responsibility:
You are responsible for everything you say over the air on KSER, and the same holds true for what you write on our website. The same rules and expectations governing your on-air activity apply online. Please exercise good judgment in what you say and do on our website. Everything you write reflects on KSER and affects everyone else who works and volunteers here. The well-being of this truly unique and rare resource rests under your fingertips.
Accessing the KSER website content management system
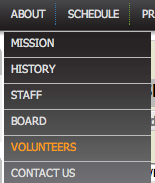 To begin working with content on the KSER website, you must first log-in as a valid user. To do this, go to the website and under the "About" menu, select "Volunteers".
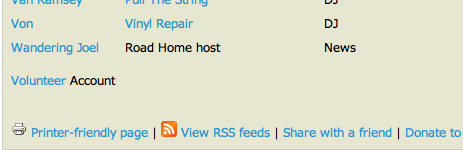 At the bottom of this page, you'll see a link to "Volunteer Account". Click on this.
In the screen that pops up, type your username (always FirstnameLastname, no spaces but each name capitalized), i.e. BruceWirth.
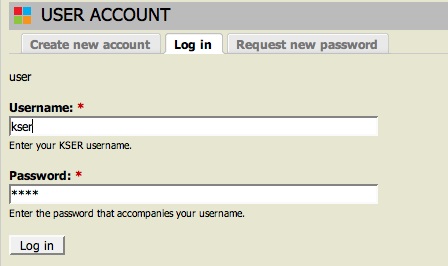
Type in your temporary password:
DJs:
asdf
News Producers:
asdf;lkj
Managing Your Content
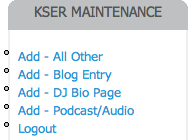
Once you have logged in, you can use the same menu at the bottom left of your screen to manage add a blog post or create other content. To change existing pages, do directly to those pages and simply click "Edit".
DO NOT CREATE A NEW BIO PAGE, A NEW SHOW, OR A NEW PROGRAM.
These have already been created, and you'll just confuse our website database.
Editing your Biography
To edit your Bio page, go to the "About" menu (at top of page), and select "Volunteers" from the drop-down menu. When you click on your name, you'll be directed to your Bio page, where you can edit it.
Editing your Program
To edit your Program information, click on the "Program" menu, and then click on your show. You can now edit your program information.
Adding a new page
To add any page, including a blog post, you must follow these four steps:
- Click "Add Blog" (or whatever else you want to add)
- Fill in all the required information.
- Submit your post.
The “Submit” button is at the bottom of the whole webpage. If you are writing a rather long page, it’s a good idea to submit the page every 5-10 minutes and just re-open it for editing. This way, you’ll save your work as you go. Otherwise, one problem with your browser and you’ll loose all your work.
We’ll describe the process of adding a blog post, since this is the most common activity you’ll do when using our website
 To add a new blog post, click on the appropriate menu item.
You’ll see the standard editing form.

Using the Editor
The editor is a simplified word processor that allows you to format documents, add pictures and links, and publish your page to the website. There are three key elements to posting a page:
Title, Show, and Body.
- The Title is whatever you wish to name the page (no profanity of course!)
- The Show is somewhat of a misnomer, and actually refers to the Host of the show. Shows as we understand them are called Programs in Drupal.
- The Body is where you type the text of your page, and add any special formatting.
There are many features of the Editor, and most should be familiar to you from using other word-processing programs (such as Microsoft Word). However there are a couple features (and some quirks) unique to the Editor which are described in the following pages.
The Tool Bar
The icons on the Toolbar are the controls for various formatting options. The ones you’ll use most frequently are the Clipboards, image controls and hyperlinks.
The Clipboards![]()
The Clipboards give you three different options for pasting text into a webpage:
- Paste (as is)
- Paste Text
- Paste from Microsoft Word.
Paste
The first (Paste) keeps whatever formatting the original text is in, including fonts, links, tables, etc. This can be useful when you want to post something from another webpage (such as your MySpace of Facebook page). But in order to secure our website from possibly malicious code (as in a webpage that has been accidentally poisoned with a virus-like script), the Paste clipboard only renders a simplified set of HTML formatting. In many cases, what you paste in your page may not look or work correctly, so it may be better to paste the content as plain text, which is the purpose of the second Clipboard, Paste Text.
Paste Text
This Clipboard removes all formatting from the source, and pastes just the plain text. Then you can add the formatting you desire (special fonts, bullets, pictures, weblinks, etc.) using the built-in Editor. This is usually the best choice, since it ensures the Editor correctly formats your text for our website.
Paste From Word
This Clipboard preserves most of the formatting from a Microsoft Word document, but since Word has quirks of it’s own, this may result in unintended consequences. In general, it is better to paste plain text, and format your page using the Editor.
Once you are done writing your page, don't forget to hit "Submit" at the bottom to publish your file to the web.
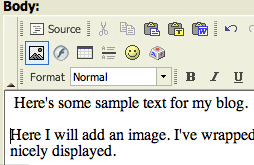
Adding Images
There are several steps to adding an image to your webpage. You must first place your cursor at the point in the text you want your image to reside. You must upload your image to the KSER website, so that the file system can find the image. Then you must determine its size and location on the page. And you must include a text description of the image so sight-impaired website users can still access the information.
To place the image, start by putting the cursor where ever you would like the image to be, then click on the Insert Image icon.![]()
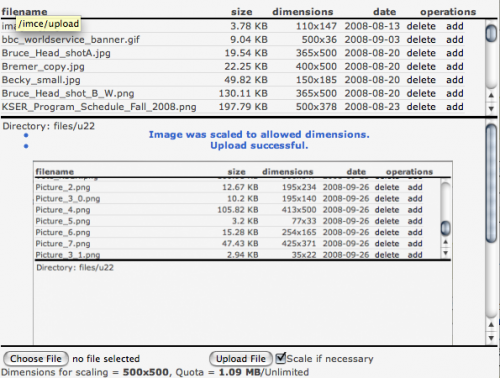
Next, you must upload the image you would like to use. Click on "Browse Server" to find the image you'd like to use.
Uploading an Image
You cannot just paste an image into the Editor. Our webserver has to have a copy of the image on file in order to “send” it to visitors to our website.
After you click "Browse Server" you’ll see this navigation box which allows you to locate an image on your computer, then upload it.
If the image is already on the server, it will be in the list at the top of this window. If it is not on our server, you'll have to upload the image from your computer.
Click on "Choose" to locate the image on your computer, then "Upload" to put it on our webserver. You'll see a message in the middle window when your image has been loaded successfully.
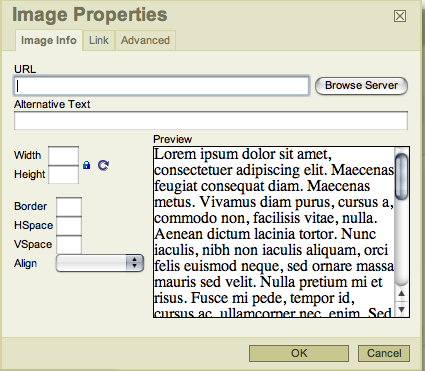
Placing an Image
Click on the image, and you'll be back to the panel which you'll use to place your image.This dialog box gives you control over the size of the image (usually between 100 and 300 pixels wide). It also controls how you'd like to wrap the text around the image. You can also add a link to the image (although this feature doesn't work all the time).
Select how you want to align the image, and then press "O.K." The image will now appear in the body of your text.
You may need to do this several times to get it to look the way you want. Experiment, have patience, and you'll get the hand of it.
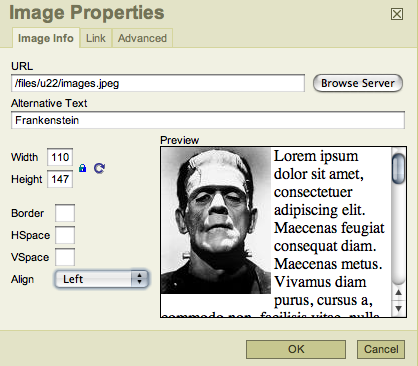
Note: It’s important to add a description of the image for those folks who may be vision-impaired and need to access our website using a text-reader.
And don't forget to hit "Submit" at the bottom to publish your file to the web.
Adding a link to another webpage
You can also use the toolbar to add links to other pages, either internal pages on our website, or other pages elsewhere on the internet.
It really couldn’t be much simpler.
Just highlight the text you want to use for the link, then click on the “link” icon![]()
Type the link in the URL field, and click O.K.
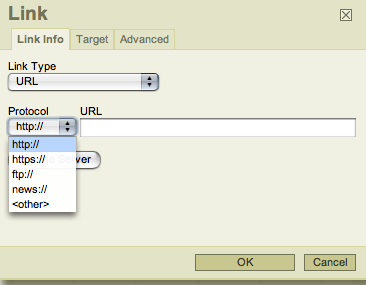
Don't forget to hit "Submit" at the bottom to publish your file to the web.
Adding an audio clip
You can also add an audio clip to your page, but beware:
YOU CANNOT ADD COPYRIGHTED AUDIO TO YOUR SITE.
That means songs from CDs, MP3s from the web, and bootlegs. Unless you receive written permission from the copyright holder (usually the record company—not the performer) you could get KSER sued for posting unlicensed audio. When in doubt, do not post audio from a performer.
You can, however, add interviews you do with musicians, your own music, and anything produced specifically at KSER (your commentaries, your news stories, live performances at KSER, etc.)
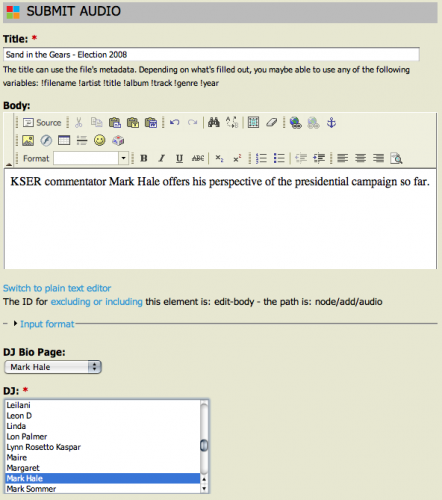
To add an audio clip, you must fill in a lot of information about the audio clip, so that search engines (like google) and our own website search feature can find your audio.
To begin with, add a title to your audio post. If your audio is part of a recurring program, the title should include that in the following format:
Show Name - Episode Name
Example: Sand in the Gears - Election 2008
You must also link the audio to your DJ Bio Page, and to your name in the DJ list (two different things).
Uploading Audio and Filling in Metadata.
Now you must upload your audio and fill in more details about it. To upload, click on "Choose File". You'll also want to check the box "Allow File Download".
You can also fill in information for iTunes, although at the moment our audio is not available on iTunes. You can also add a more detailed description, but it is not necessary.
Finally, fill-in the Clip Air-Date and Time.
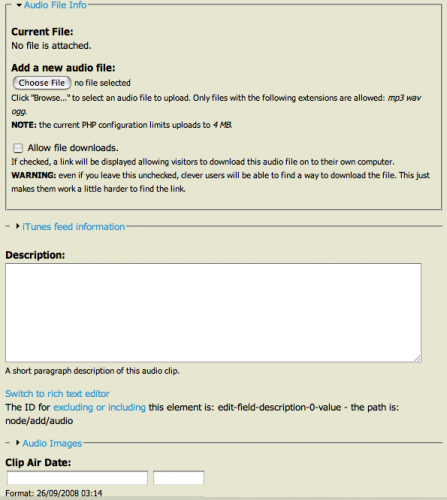
Don't forget to hit "Submit" at the bottom to publish your file to the web.
Problems
Like all software, there are some quirks, which you will no doubt discover. This is especially the case with open source software, where independent programmers write all this code for free. Please be patient and take the time to learn how to use our website. If you have a problem, contact Bruce, and I’ll try to help you work around it.
Known issues:
1. Image problems
Once you’ve placed a picture, you usually can’t go back and change how it is displayed. Instead, you have to add the picture again using the “Image” button. Also, sometimes it is hard to add a link to an image. Our designer is troubleshooting that.
2. Audio problems.
At the moment, our website host (1and1.com) is limiting the size of audio files to around 5Mb, but we are in the process of fixing that, and hopefully by the time the site launches, we’ll have that problem solved. Also, for the time being, you may always receive an error message after you upload an audio clip. Simply enter your name as the Artist, and under Title, the Show Name - Clip Name. Our webdesigner is tracking down this bug too.
3. Playlist software
The software is working on our end, but most of you have not been trained how to use it. I will schedule workshops with programmers after our pledge drive. Until we start using the software in our studio, the playlists online will be empty or have only dummy text.
Let me know of any problem you encounter as you get used the our content management system. Be patient and all will be revealed!
- 14903 reads
 View RSS feeds


Post new comment